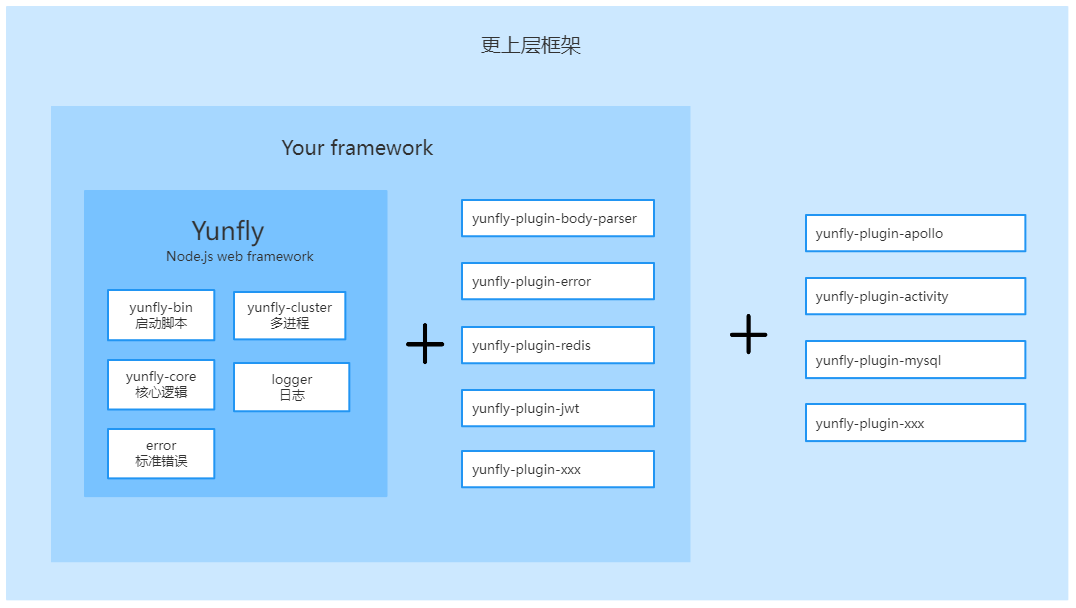
框架开发
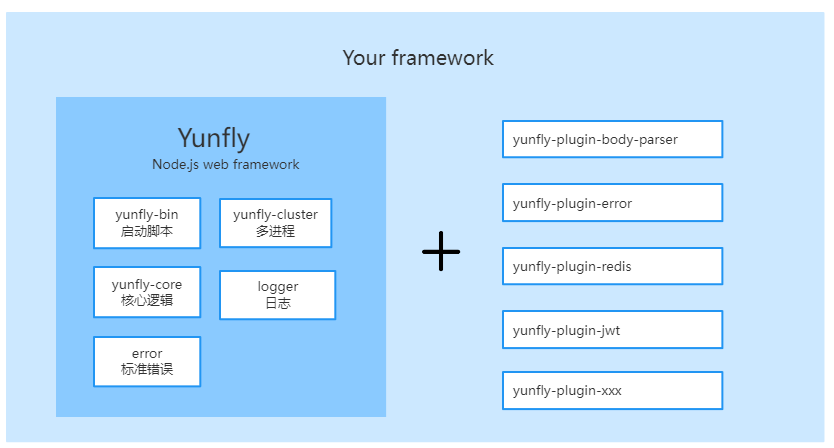
yunfly 提供了一套强大的插机制, 支持内置一系列的插件组合成一个新的框架。
- 下面举一个简单的例子, 在
@yunflyjs/yunfly基础之上搭配一个@yunflyjs/yunfly-plugin-redis插件组合成一个新的框架。
底层技术
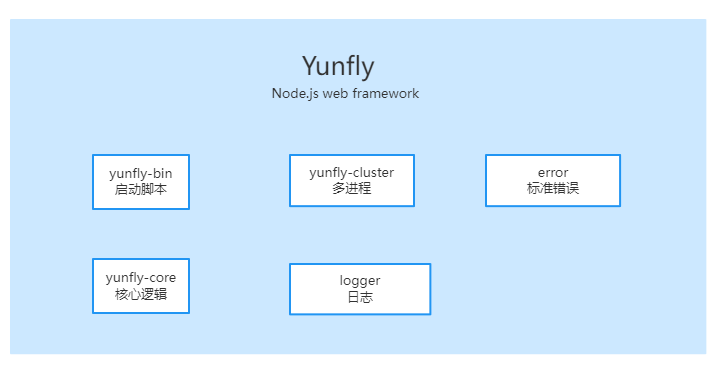
@yunflyjs/yunfly作为底层基础库@yunflyjs/yunfly-plugin-redis作为框架内置插件
开发步骤
1. 创建框架文件夹
mkdir yunfly-framework-example

cd yunfly-framework-example
2. 安装依赖
- 安装 dependencies 依赖
yarn add @yunflyjs/yunfly @yunflyjs/yunfly-plugin-redis- 安装 devDependencies 依赖
yarn add typescript@4 gts@0 --dev3. 配置 package.json
识别为Yunfly框架最核心的字段为 "framework": "yunfly"。
package.json
{
    // 配置 name 字段
    "name": "@yunflyjs/yunfly-framework-example",
    // 配置版本
    "version": "1.0.0",
    // 入口文件
    "main": "build/index.js",
    // typings 类文件
    "typings": "build/index.d.ts",
     // 【核心字段】标识当前库为 yunfly 框架
    "framework": "yunfly",
    // node 版本
    "engines": {
        "node": ">=12.17.0"
    },
    // 允许上次 npm 包的文件
    "files": [
        "bin",
        "build"
    ],
    // 配置 scripts 脚本命令
    "scripts": {
        "build": "npm run clean && npm run compile",
        "dev": "tsc --watch",
        "clean": "gts clean",
        "compile": "tsc -p .",
        "prepublishOnly": "npm run build"
    }
}- 此刻完整的 package.json 为
package.json
{
    "name": "@yunflyjs/yunfly-framework-example",
    "version": "1.0.0",
    "main": "build/index.js",
    "typings": "build/index.d.ts",
    "framework": "yunfly",
    "engines": {
        "node": ">=12.17.0"
    },
    "files": [
        "build"
    ],
    "scripts": {
        "build": "npm run clean && npm run compile",
        "dev": "tsc --watch",
        "clean": "gts clean",
        "compile": "tsc -p .",
        "prepublishOnly": "npm run build"
    },
    "dependencies": {
        "@yunflyjs/yunfly": "^1.0.1"
    },
    "devDependencies": {
        "gts": "0",
        "typescript": "4"
    }
}
4. tsconfig.json
- 根目录下创建
tsconfig.json文件
tsconfig.json
{
  "compilerOptions": {
    "rootDir": "./src",
    "outDir": "./build/",
    "module": "commonjs",
    "target": "es6",
    "strict": true,
    "allowJs": false,
    "noUnusedLocals": true,
    "removeComments": true,
    "declaration": true,
    "skipLibCheck": true,
    "importHelpers": true,
    "esModuleInterop": true,
    "resolveJsonModule": true,
    "moduleResolution": "node",
    "experimentalDecorators": true,
    "forceConsistentCasingInFileNames": true,
    "emitDecoratorMetadata": true,
    "noEmitOnError": true,
    "noUnusedParameters": false,
    "strictPropertyInitialization": false,
    "sourceMap": false,
    "declarationDir": "./build/"
  },
  "include": [
    "src/**/*.ts"
  ],
  "exclude": [
    "node_modules",
    "src/__tests__"
  ]
}
5. 插件核心逻辑
- 创建
src/index.ts文件, 用于框架导出变量
src/index.ts
import FlyApp from '@yunflyjs/yunfly'
import { cacheRedis, getRedis } from '@yunflyjs/yunfly-plugin-redis';

export * from '@yunflyjs/yunfly'
export {
    cacheRedis,
    getRedis
}
export default FlyApp;- 创建
src/config/config.default.ts文件
src/config/config.default.ts
import { Config } from '@yunflyjs/yunfly';

export default function config(): Config {
    const config: Config = {};
    config.redis = {
        enable: false,
    }
  return config;
}- 创建
src/config/config.plugin.ts文件
src/config/config.plugins.ts
import { PluginConfig } from "@yunflyjs/yunfly";

const plugins: PluginConfig[] = [
    {
        name: 'redis',
        package: '@yunflyjs/yunfly-plugin-redis',
        priority: 50,
    },
];

export default plugins;
6. 发布 npm 包
发布到自己的私仓或npm。
7. 使用
-
- 安装 npm 包
yarn add @yunflyjs/yunfly-framework-example-
- 配置脚本命令
package.json
{
    "scripts": {
        "dev": "cross-env NODE_ENV=dev PORT=3000 yunfly",
        "watch:dev": "cross-env NODE_ENV=dev PORT=3000 yunfly --watch"
    }
}-
- 启动应用
yarn watch:dev // open: http://127.0.0.1:3000总结
根据以上的案例可以看出,开发框架最核心的步骤包括:
-
package.json中配置"framework": "yunfly"字段标识前库包于yunfly框架。
-
src/config/config.plugin.ts中启用需要的插件集合
框架开发演进图
yunfly 框架
定制你自己的框架
抽象更上层的框架